google.com, pub-1183232341631896, DIRECT, f08c47fec0942fa0 We Discover Canada And Beyond
My RV Cook Book, "Tinfoil Cooking" is now published on Amazon!

Check it out Amazon.ca, Amazon.com, Amazon.de, Amazon.co.uk or any other site worldwide! For a luxury coilbound version on 80# stock go to my cooking website AndersCooks.ca


24 June 2014

Yukon and Alaska Bound, Part 1


Cortes Island to Vancouver Island


Leaving our home on Cortes Island
Finally, I do not have anymore excuses not to write the first blog. Our three month trip will take us through British Columbia,  The Yukon a small part of  the North West Territories and the state of Alaska.

On the 12th of June we left our home on Cortes Island, BC and stopped in Campbell River (on Vancouver Island) to pick up the last few things.

We then pointed the truck south and checked in at Rathtrevor Beach Provincial Park  just south of Parksville. More pictures here.

Camped at Rathtrevor Park
Rathtrevor is an awesome park, the camp sites are very large and private with wooded spaces between each site.

They even deliver camp fire wood to your site, only pay for the wood.

We cooked up a prime rib roast on the BBQ. We felt that we started our holiday trip for good and enjoyed the first evening with a glass of wine.

The roast got a bit burned, my excuse was the "New BBQ".


View from West Bay Marina and RV Park
Sarah, Linda, Lisa and Ryan.

Mark, Liz and Sarah

Linda and Mathew

The next morning we drove down to Victoria and checked in at the West Bay Marina and RV Park.


This RV Park is right in Victoria on the water.


The sites are very tight, but it is well worth it, if you want to stay right down town.


We stay here every time we go to Victoria with the camper.


If you go, make sure to have a reservation, otherwise you will more then likely be out of luck.


We stayed in Victoria for two nights and visited with our kids and grand kids.


We said our good byes and collected a lot of good hugs. Victoria pictures here.


Jenny, Josh and Isla

Anders (Morfar) and Amber

Jenny, Liz (Mormor) and little Isla


Sunday the 15th, we took the ferry across to Vancouver and drove over to Fort Langley and Brae Island Regional Park.


This is a really nice park. We stay here often when visiting the Vancouver area.


We had a great day with more kids and grand-kids and more hugs, just wonderful. More pictures from Brae Island


Monday the 16th, we were on the road bright and early. Heading east on the number 1 Hwy.


Driving along the Fraser River, we stopped in Hope. A plaque in the park told us that we will travel a long time along the Fraser.


The stretch between Hope and Cache Creek is windy, but beautiful. Once we turned onto the # 97 north, the landscape changed from lush and coastal to dry and ranch land.


Camped at Hat Creek Ranch
Our stop for the night was at the intersection of highways 97 & 99 at the Hat Creek Ranch.

The campground is OK it is in an open field, good for one night stop-over.

Hat Creek Ranch is an historical ranch and they offer guided tours.

You could even ride on a stage coach or take a trail ride if you wanted. Some food, drinks, souvenirs and ice-cream can be purchased at the ranch store. More picturesfrom Fort Langley to Hat Creek.

Female Big Horn Sheep

Chasm Provincial Park


Next morning we continued our journey north bound to a little town called Hixton, just south of Prince George.


On the way, we stop in at Chasm Provincial Park. Chasm is like a mini Grand Canyon.


It is only 4 km off the Hwy 97 on good gravel road. If you have time, it is worth the side trip.


At the Chasm we saw a bunch of Big Horn Sheep.


Those animals can just about walk straight up and down rock cliffs.


The heard we saw were only females and little ones. The male only come around in breeding season. Pictures.


Packed ready to to go, Yukon and Alaska, here we come!
Back on Hwy 97 north we enjoyed the views and the drive along Lac La Hache, and we stopped in at the information centre in Williams Lake. A funny display shows how Anders likes to pack!


We arrived early in Hixton and the Canyon Creek RV Park.


Canyon Creek is a well run park. It was time to do some laundy. Their laundry room has older machines, but is spotless.


Later in the day some friends stopped in, and we had happy hour together. Life is good.


Wednesday, June 18th we left  Hixton behind in search of the Blue Cedar RV Park just west of Prince George on Hwy 16.


We checked in early around 11 am. The manager must have stepped out off bed on the wrong side, he did not seem too happy to see us, smiles were at an extra cost.


The park looks a bit tired, but is acceptable for a nights' stay. It is very convenient and close to downtown Prince George.

Once our camp was set up we headed into Prince George. We visited the Railway Museum which was interesting, but it needs more money to make it more exciting. Probably would be great for kids, they have a mini train they can ride.

We had lunch at the Twisted Cork on 5th Avenue. The food was good and tasty with great service.

Liz at the Two Rivers Gallery

University of Northern British Columbia
After lunch we went to the "Two Rivers Gallery" with a couple of exhibitions. The architecture of the building is great.


Then we drove up to the University of Northern British Columbia.


It is just out of town a bit, high up and has a beautiful campus with tons of residences for the students.


Back in camp we talked to our new neighbours, Amy and John, from the state of Oregon. More pictures from Prince George here.


They had sold their house and are RVers full time. Really nice people. John is researching "Forts" in Canada and the USA.

Thursday we left Prince George and drove up to Fort St James National Historic Site. More on that in our next post.

>>> NEXT >>> post in this series.

Here are some shortcuts to all the blogs post from our Yukon and Alaska Trip. Just hover over the number to see where it will take you.

  1,    2,    3,    4,    5,    6,    7,    8,    9,  10

11,  12,  13,  14,  15,  16,  17,  18,  19,  20

21,  22,  23,  24,  25,  26,  27,  28,  29,  30

31,  32,  33,  34,  35,  36,  37,  38,  39,  40

41,  42,  43,  44,  45,  46,  47,


18 June 2014

The Little Things, Make The RV Life Easy


Little Things Can Make a Big Difference.


There are a lot of little things that many of us create to make the RV more comfortable and easier to work with.

Here are some of the things we have done:


Motion Sensor light in cupboard
Motion sensor lights in the cupboards.


This is so nice! It is a must, we have even put some in our house is some of the places that did not have any lights.

An RV often has small deep storage places that are hard to get to. Installing one of these lights, and being able to see, makes such a difference. 

Here is a tip; attach the light vertically with industrial (from Canadian Tire) Velcro on the wall of the cabinet, it will stay in place on rough roads ( the Velcro provided with the lights are not substantial enough!).


Coat Rack


You would think that this is a no brainer. Very few RVs have coat racks where you can hang your coat, hat, scarf..... 

You just can't have too many of them. Another tip: be careful when attaching the rack, especially on outside walls, if the screw is too long guess what????? Right, you will be swearing for a while, I talk from experience, not funny!


Key Rack
Key Rack

Shoe Rack


This is also something so easy but saves so much time and frustration. Have it close to the door and you will always remember to hang your keys there when you enter the RV. 

Tip: have two set of keys of everything, one for your co-pilot and one for you. Having two identical sets make life so much easier.


Shoe Rack


Tidy and so convenient: as you are aware, all the shoes always pile up at the front door. 

Pick up a narrow shoe rack from IKEA and screw it to the floor. 

This is a super investment. It adds some weight, but is well worth it. No more stumbling over a bunch of shoes. Again, be careful if you attach it to the outside wall.


Attach a light with industrial Velcro

Use some Velcro


There are so many uses for Velcro. 
We have a free standing light at the rear of the trailer that is attache to the desk with Velcro. 

My alarm clock by the bed is attached with Velcro. The mug that holds the tooth brushes in the bathroom is attached with Velcro to the wall. 

Indoor cell phone booster antenna is attached this way and the list goes on. I'm sure you can think of many more.


Hanging Organizer.
Separate tools attached to RV wall in storage.

Storage rack for canned goods.


I think this actually is designed for ladies shoes. This organizer that fits in the closet is super for storing t-shirts, undies etc.


Separate RV set of Tools.


I got tired of always moving tools around. With the limited space I decided to have a permanent set of tools for the RV, the problem was to have things handy. What we came up with, was to attach hooks on the walls in the storage compartment and hang the tools there. Works fantastic.


Less strain on your RV coupler with this elbow

Storage Racks for Canned Goods.


As we all know, space is limited in the RV. Find a storage compartment with an accessible wall to add some wire racks or canned goods. Keep in mind canned goods are heavy.


The Water Hose - Coil Retractable


For exactly two years I was fighting with the unruly water hose. When it was a bit cold, it was so hard to work with and coil up. Solution: get a "coil retractable" water hose. Just make sure it is good for drinking water. A 50 ft. hose is dead easy to handle. 

At the same time make sure to
Coil Retractable water house with pressure valve
and 90 degree elbow with shut off valve.
have a pressure reducing valve and a 90 degree elbow with a shut off valve on it. It is easy to handle, and when storing it, attach end to end so no bugs or dirt gets in. 


If you can not find the hose in an RV store, try a marine store.


Solar Night Light in Bathroom


RV Solar Night Light installed in Bathroom Sky Lite

Adding a solar night light in the bathroom is very easy and your partner will thank you for it. It will only take you about one hour and cost you $1.00. 


I have separate post on how I installed the solar night light. Anyone can do it.


These are just some of the things that we have found helpful and makes the RV life easier. 

We have some more pictures in the clouds, have a look.


.

16 June 2014

Custom Made Generator Box For Our RV


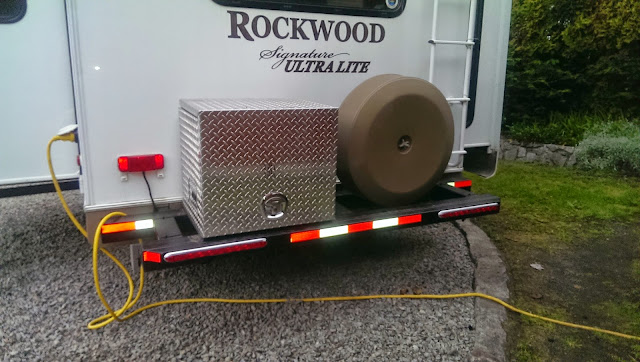
The Generator Box


Generator Box in place with generator

Box closed, note vent/electric cord hatch on left side.

Close up of box, note exhaust hatch on right.

Generator fits just nicely.
The Generator Box for our fifth wheel trailer is now up and running.

We had it custom made by CR Metal Manufacturing LTD in Campbell River, BC. 

They really are true professionals and very accommodating and helpful. 

Like with anything that is custom built you should expect to pay extra.

CR Metal Manufacturing LTD did a super job, fantastic quality and exactly what I wanted. 

I dealt with Jeff and Randy and it's hard to find more helpful people. Enough said!

The Generator box I installed with Carriage bolts from below and self locking nuts on the inside. 

I have two tie-downs inside the box holding it down so it will not bounce around.

Further I made up a 10 ft long cord to reach from the generator to the plug-in on the trailer, just around the corner of the generator.

All works fine.

You may also want to read my post about how I extended the bumper on the trailer to accommodate the generator.

Cheers,

Anders


Added some lights and reflective tape to bumper.

06 June 2014

Maintaining the Roof on Your RV


Incredible Tape and Sealant


Incredible Tape and Sealant

Tape laid down on the RV roof.
Maintaining the roof on the RV is one of those things that often is overlooked.

It's not because we ignore it, but because it is out of sight for most of us.

Unless you climb up on the roof and do a visual inspection it is not easy to see the cracks that develop in the seams.

Most of the time we have used caulking to fix the cracks.

This time around we put down a heavy duty Tape & Sealant.

We put it down in all the areas where it is not really visible and we feel this will be stronger and last longer.

The tape is 4 inches wide.

It goes down fairly easy and once it is down it does not come back up,
Tape laid down over roof cover where there is a joint under the original
roof material. This is to prevent a leak if it would wear through.

so make sure you take your time to figure out where and how you are installing it.

Once installed, I have a silicon roller that I roll over the tape to get air bubbles out.

This is a good project for a cloudy afternoon. On a warm sunny day it would get to hot up on the RV roof.

This tape is not cheap. I paid about US $60 per roll, when we came through Oregon last fall. I see they charge about $100 here in Canada at some of the RV places.

You may want to check out some roofing supply stores for prices and availability.

Till next time,

Cheers,

Anders and Liz

25 May 2014

Lumix DMC-LF1 by Panasonic


What Cameras to choose when travelling?


Since we have been asked several times what cameras we use, I figure I write a short blog on the subject.

When selecting a camera (and we have gone through a bunch of them) there are many things to take in to consideration: the size, the weight, the quality if lenses, the possibilities to exchange lenses, your type of photography, what are you going to use the pictures for ( enlargements, souvenirs, blog, research, video...).

I prefer the camera to be as small as possible, but it should produce good quality images and have video possibilities. Liz prefers cameras where she can compose and manipulate the pictures before shooting. Liz used to be a professional photographer going back to the 1970's when they actually had film in the cameras, and each image was expensive. She was an exceptional photographer! Still is. She has that touch to see what looks right in a picture.

A lot has changed since then, and Liz and her cameras (and the laptop, tablet, phone) at times have had a few disagreements. Liz, should we say get a bit "peeved" with the technology that is incorporated into the cameras. As long as it works she is fine. If not, the dialog go something like this:

Liz - That's what I am doing, how come you don't work

Camera - ___________

Liz - Why don't you listen to me, I'm doing exactly that.

Camera - ___________

Liz - ANDERS, THE CAMERA DOES NOT WORK.......

All the joking aside, Liz knows what she wants in a camera and what she wants it to do, I wish I had her knowledge, but I guess that only comes with doing it for a living, even if it was a long time ago.

Here are some things to consider when buying a new camera:
  • Size of camera ( a size you will carry along all the time )
  • A view finder and a screen or just a screen. A view finder is very handy at times.
  • Quality of the lens
  • Zoom,  how good is the zoom. Here the quality of the lens is very important.
  • Features like pre-programmed setting, Being able to shoot in manual mode
  • Movie capabilities
  • Wi-Fi, GPS, Retouch, Enhance......
  • And many more.

When we started looking for replacement cameras for both of us, we knew we wanted small cameras. We have found, if it is not small enough, we do not take them along.

Liz had an old version of the Lumix camera, and I had a Sony Camcorder that still shoots pictures and fantastic movies, but is too large, and therefore often did not come along on hikes and travels.

Liz really liked her old Lumix, except it was missing a viewfinder ( it is difficult to see the image on the screen in bright light).

We did a lot of research and came up with the Lumix DMC-LF1 by Panasonic. We now have one each.

Lumix DMC-LF1 by Panasonic
We own them now for about two months, and we are very  happy with them.

The quality of the pictures and video are fantastic. The camera can shoot a video in HD.

The camera is also  Wi-Fi capable and can transfer the pictures right to your phone or lap top wireless, a very nice feature.

We have the Lumix cameras set up so when we plug the cameras in to charge the battery, they automatically hook up via Wi-Fi to the lap top and transfer all the pictures.

I also use the camera in my phone HTC One, it is a pretty good camera but is limited to what it can do.

The Nikon and the Olympus
Our camera set up now is;

  • Two Lumix DMC-LF1 by Panaxonic, 
  • One Nikon D7000 (Liz's no doubt) and 
  • One Olympus Stylus Tough 3000 underwater camera ( that is mine, Liz hates to have her head under water ).
  • HTC One
That wraps it up....


Till next time,

Cheers,

Anders and Liz

Back to Home Page.

.

08 May 2014

Servicing Your Slide Outs


Slide Outs or Push Outs


Slide assembly under the trailer.

Using a drill with wire brush.

Nice and clean tracks using a de-greaser and then wash down with water.

Rubber seals around slide

Slide-Out Dry Lube and Slide-Out Rubber
Seal Treatment.
I have found over the years that servicing the gears and tracks on the trailer underside of your slides goes a long ways.

What I do every year, is crawl under the trailer with the slides out and clean the actual gears and tracks.

You can do this with a wire brush or a brush attachment on your cordless drill. If you use a wire brush, make sure to wear protective glasses.

The easier way is to use a de-greaser, spray it on, let it sit according to instructions and then wash off with water.

This works really well and gets most of the dirt and road grime off.

Once it is dry, I spray on "Slide-Out Dry Lube" on the gears and track. It makes them run really nice and smooth and very quiet.


Rubber Seals On Your Slides


Don't forget to service and clean the rubber seals around the slides.

It only takes a few minutes, but it will make the rubber seals last longer without getting cracks etc.

I use soap and water to wash them down, then once they are dry, I spray on "Slide-Out Rubber Seal Treatment".

You just spray it on (goes on like a foam), spread it out and let it dry into the rubber. That's it.

While you are at it, you could do the same on all the rubber seals on your truck doors as well.

You get less wind noise while driving, and it looks nice and clean.

Hope that helps a bit.

27 April 2014

Carefree Vacation'r Room


Carefree of Colorado Screen Room for our 5th Wheel Trailer


Home Sweet Home. Cortes Island, BC.
As you know we are in the process of preparing for our trip through British Columbia north to Yukon Territory and Alaska.

We have heard and read (check out Barb Rees book "RV Canada's Far North on a Dream") that mosquitoes and black flies can be a bit of a pain.

We did a lot of research to see if we could find a screen room for our awning on our trailer. We came up with a great solution from Carfree of Colorado. They have a screen room; "The Vacation'r Room".
Two of three walls up.

The skirting will also be added later.

View from the back of the trailer

All walls are up. Will set up the skirting next time.
I phoned Carfee of Colorado just to confirm that it will fit our trailer.

You need the make and model number of your current awning and they will tell you what screen room fits.

Once we had it all confirmed we called 877-340-5561 our local dealer Bill Howich RV and Marine  (talk to Rick Hansen) in Campbell River, and ordered one in. They always do a great job.

Once we got the screen room we set it up in our yard to see how it works and fits.

All looks well and it will go up fairly easy (not in 5 minutes that some claim) once we are used to it all.

This screen room will not only protect us from pesky mosquitoes, but it will also give us a lot more outdoor living space.

Did not have time to set up the skirting, as rain was quickly approaching. Will do that next time.

Over all a great quality product.

We will keep you posted.

Cheers,

Anders and Liz

20 April 2014

Extending the Bumper on 5th Wheel Trailer


Bumper Extension for Generator Box


It's late April 2014 and we are preparing for our trip through British Columbia, Yukon and into Alaska.

During this upcoming trip, we expect to do a fair amount of dry camping (camping without hook-ups of any kind), therefore we decided to purchase a generator to give us more flexibility.

EFYamaha2400iSHC generator
Our generator EF Yamaha2400iSHC
We bought a "EF Yamaha 2400 iSHC" , it will run the whole trailer including the AC if needed.

To house the generator we will have an aluminum box custom built and mounted on our rear bumper.

We envision running the generator right in the box, so the box will be built with maximum airflow and ventilation in mind.

To accommodate the generator box we had to extend the bumper and also raise the spare tire rack.

Spare tire bracket prior to extension
Original spare tire bracket.

Original bumper
Original bumper
The work on the bumper we had done by CR Metal Manufacturing LTD in Campbell River and they did a fantastic job.

We decided to extend the bumper with 12 inches and then add a second bumper that will also serve as storage for a sewer hose extension. Further, we also had a 1/4 inch plate welded on, and that's where the generator box will sit.

We designed the second bumper not as wide as the first. We recessed it 6 inches on each side. This way, when we make a turn in tight quarters, it will be less likely to hook on anything. Besides I think it looks better. The spare tire rack we had to make four inches taller. Before the spare tire was sticking out past the bumper.

Now the second bumper will take the load should we back up into anything, or if someone should bump in to us.

More on the generator box as it is being built. I have most of the design done. Scroll down for more pictures. Update, finished generator box click here.

Cheers,

Anders


Spare tire bracket after extension.
New extended spare tire bracket.


Bumper extension prior to paint.
Bumper extension prior to paint


Painted bumper
Paint job done.

Painted bumper with spare tire in place.
Finished with spare tire in place.

Added some lights and reflective tape to bumper.
Added some light and reflective tape to the bumper.

Update; Bumper Extension on our RV or Fifth Wheel Trailer October 2016.


The extension of the bumper stood up well. We traveled from our home here in BC to Yukon and Alaska and back. Further we made a trip all the way down to the tip of Baja California and back. In total approximately 25,000 to 30,000 km. All this on some pretty rough roads.  However the rough roads took it's toll on the bumper extension.

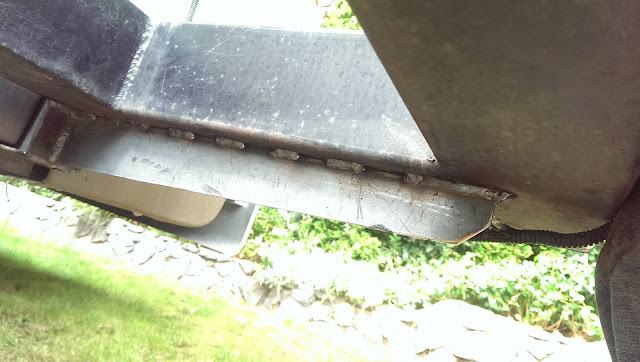
I ended up doing some re-enforcing. See the pictures below. I would have to say, if I were to build one again, I would make a lot stronger then the first time. With the re-enforcement we have now it is very strong and should be just fine.

RV Bumper Extension support on our 5th wheel trailer
New support welded on under the bumper

Diamond bracket welded on to the I-beam and the bumper for extra strength on our RV or fifth wheel trailer
Diamond bracket welded on to the I-beam and the bumper for extra strength.
Close up of diamond bracket welded on to the I-beam and the bumper for extra strength on our RV
Close up of diamond bracket welded on to the I-beam and the bumper for extra strength.