google.com, pub-1183232341631896, DIRECT, f08c47fec0942fa0 We Discover Canada And Beyond: April 2014
My RV Cook Book, "Tinfoil Cooking" is now published on Amazon!

Check it out Amazon.ca, Amazon.com, Amazon.de, Amazon.co.uk or any other site worldwide! For a luxury coilbound version on 80# stock go to my cooking website AndersCooks.ca


27 April 2014

Carefree Vacation'r Room


Carefree of Colorado Screen Room for our 5th Wheel Trailer


Home Sweet Home. Cortes Island, BC.
As you know we are in the process of preparing for our trip through British Columbia north to Yukon Territory and Alaska.

We have heard and read (check out Barb Rees book "RV Canada's Far North on a Dream") that mosquitoes and black flies can be a bit of a pain.

We did a lot of research to see if we could find a screen room for our awning on our trailer. We came up with a great solution from Carfree of Colorado. They have a screen room; "The Vacation'r Room".
Two of three walls up.

The skirting will also be added later.

View from the back of the trailer

All walls are up. Will set up the skirting next time.
I phoned Carfee of Colorado just to confirm that it will fit our trailer.

You need the make and model number of your current awning and they will tell you what screen room fits.

Once we had it all confirmed we called 877-340-5561 our local dealer Bill Howich RV and Marine  (talk to Rick Hansen) in Campbell River, and ordered one in. They always do a great job.

Once we got the screen room we set it up in our yard to see how it works and fits.

All looks well and it will go up fairly easy (not in 5 minutes that some claim) once we are used to it all.

This screen room will not only protect us from pesky mosquitoes, but it will also give us a lot more outdoor living space.

Did not have time to set up the skirting, as rain was quickly approaching. Will do that next time.

Over all a great quality product.

We will keep you posted.

Cheers,

Anders and Liz

20 April 2014

Extending the Bumper on 5th Wheel Trailer


Bumper Extension for Generator Box


It's late April 2014 and we are preparing for our trip through British Columbia, Yukon and into Alaska.

During this upcoming trip, we expect to do a fair amount of dry camping (camping without hook-ups of any kind), therefore we decided to purchase a generator to give us more flexibility.

EFYamaha2400iSHC generator
Our generator EF Yamaha2400iSHC
We bought a "EF Yamaha 2400 iSHC" , it will run the whole trailer including the AC if needed.

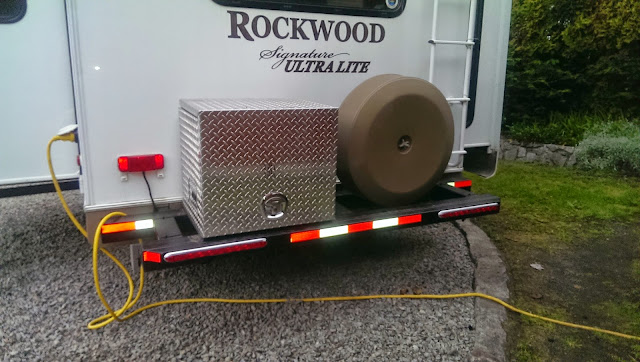
To house the generator we will have an aluminum box custom built and mounted on our rear bumper.

We envision running the generator right in the box, so the box will be built with maximum airflow and ventilation in mind.

To accommodate the generator box we had to extend the bumper and also raise the spare tire rack.

Spare tire bracket prior to extension
Original spare tire bracket.

Original bumper
Original bumper
The work on the bumper we had done by CR Metal Manufacturing LTD in Campbell River and they did a fantastic job.

We decided to extend the bumper with 12 inches and then add a second bumper that will also serve as storage for a sewer hose extension. Further, we also had a 1/4 inch plate welded on, and that's where the generator box will sit.

We designed the second bumper not as wide as the first. We recessed it 6 inches on each side. This way, when we make a turn in tight quarters, it will be less likely to hook on anything. Besides I think it looks better. The spare tire rack we had to make four inches taller. Before the spare tire was sticking out past the bumper.

Now the second bumper will take the load should we back up into anything, or if someone should bump in to us.

More on the generator box as it is being built. I have most of the design done. Scroll down for more pictures. Update, finished generator box click here.

Cheers,

Anders


Spare tire bracket after extension.
New extended spare tire bracket.


Bumper extension prior to paint.
Bumper extension prior to paint


Painted bumper
Paint job done.

Painted bumper with spare tire in place.
Finished with spare tire in place.

Added some lights and reflective tape to bumper.
Added some light and reflective tape to the bumper.

Update; Bumper Extension on our RV or Fifth Wheel Trailer October 2016.


The extension of the bumper stood up well. We traveled from our home here in BC to Yukon and Alaska and back. Further we made a trip all the way down to the tip of Baja California and back. In total approximately 25,000 to 30,000 km. All this on some pretty rough roads.  However the rough roads took it's toll on the bumper extension.

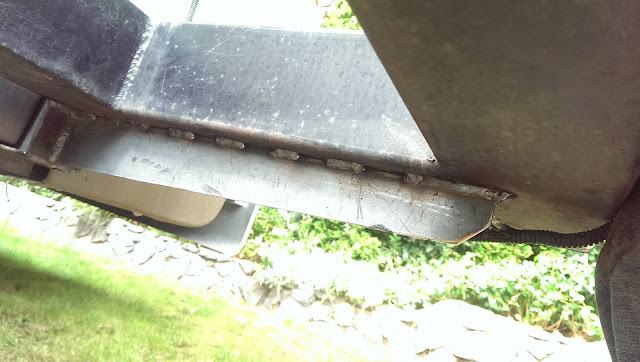
I ended up doing some re-enforcing. See the pictures below. I would have to say, if I were to build one again, I would make a lot stronger then the first time. With the re-enforcement we have now it is very strong and should be just fine.

RV Bumper Extension support on our 5th wheel trailer
New support welded on under the bumper

Diamond bracket welded on to the I-beam and the bumper for extra strength on our RV or fifth wheel trailer
Diamond bracket welded on to the I-beam and the bumper for extra strength.
Close up of diamond bracket welded on to the I-beam and the bumper for extra strength on our RV
Close up of diamond bracket welded on to the I-beam and the bumper for extra strength.