google.com, pub-1183232341631896, DIRECT, f08c47fec0942fa0 We Discover Canada And Beyond: RV Stuff
My RV Cook Book, "Tinfoil Cooking" is now published on Amazon!

Check it out Amazon.ca, Amazon.com, Amazon.de, Amazon.co.uk or any other site worldwide! For a luxury coilbound version on 80# stock go to my cooking website AndersCooks.ca


Showing posts with label RV Stuff. Show all posts

22 March 2019

My first RV Cook Book is now available on Amazon; Tinfoil Cooking


Tinfoil Cooking; RV Cookbook


Tinfoil Cooking is the ultimate cookbook for the outdoors. Easy cooking for Camping, RV'ing, Boating and at home. Delicious meals with very few or NO DISHES! 

This book is for RV'ers, boaters, campers and at home. Easy to follow recipes that everyone can use.

Wow, it has been a fun journey getting this book up on Amazon. I sure have learned a lot about publishing. Not as easy as one might think.

Front cover of my book Tinfoil Cooking
Front Cover of Tinfoil Cooking


If you are looking to make your camping or boating trips a bit easier then this books is for you. 

Do you dread having a whole bunch of dishes to clean up when you are out camping or boating or even at home? Then this book is for you. Actually, it’s a silly question — of course, you do, no one wants to do dishes and clean up the big mess left behind when you cook up a big meal.

If you are like me and want to simplify the whole cooking process without sacrificing on flavour, then this book is for you.

If you like to cook up the tenderest ribs ever, then this book is for you?

If you like to make the best-tasting vegetables supercharged with flavour, then this book is for you.

If you like to cook up some pasta without a pot and without steaming up your whole camper or boat, then this book is for you. You can even cook the pasta over a campfire.

Back Cover of my Book Tinfoil Cooking
Back Cover of Tinfoil Cooking

Do you enjoy freshly baked artisan bread with your breakfast, lunch or dinner? No kneading required. Then this book is for you.

I truly hope you enjoy the recipes in this book so you can spend more time with family and friends and less time washing dishes.

My book hit the Amazon #1 Best Seller in outdoor cooking.
Amazon #1 Best Seller in outdoor cooking.


My book is available on Amazon in all countries that Amazon operates in. For ease of ordering, here are some links, Amazon.ca, Amazon.com, Amazon.de and Amazon.co.uk.  You can also search the book Tinfoil Cooking or my name Anders Treiberg on your favourite Amazon site. Please NOTE, you do not need an e-reader for the digital version, you can download a free app here.

Enjoy,

Anders

02 January 2018

Torquing The Wheels On Your RV Or Tow Vehicle


Don't Forget to Torque the Wheels on Your RV


Torquing the wheels on your RV and tow vehicle.
So many RV'ers that I talk to have never retorqued the wheels on their RV or tow vehicle.


Most of us have probably watch Youtube movies where wheels have come loose and roll past or of to the side.


This can very well happen and it is a good habit to re-torque the wheels every so often. Not only re-torquing the wheels, check the tires and maybe even give the wheel bearing a shot of grease.


Just checking the overall wheel assembly. I always crawl under my RV and truck making sure all is in order and looking for something out of the ordinary.


To re-torque the wheels you need the proper tools and doing it right is important.


If it is not tight enough, the wheel can come loose and if you torque the wheels too much you can strip the threads.


Check in your local auto supply shop for a sale on torque wrenches. You need one of those for sure! I bought mine at Canadian Tire on sale 60% off.

Buy yourself a good quality torque wrench with an extension  3/4 inch drive.
Buy yourself a good quality torque wrench with an extension
3/4 inch drive.
Check your manual or with your RV dealer how much the wheels should be torqued to.


For my tow vehicle; 2017 Ram 3500 Longhorn I torque the wheels to 135 ft-lb. On our fifth wheel trailer, I torque the wheels to 125 ft-lb.


Note that the lug nuts, hardware seats, and studs should always be free of grease, oil or dirt. It is the friction between the hardware seat that determines the torque needed.


If you oil any part you will not have an accurate reading and you can strip the threads or even break the lug nut.


If you are not sure if your torque wrench is working properly, take it into your tire shop, they might be able to check it for you. I take mine to my local Kal Tire shop.


For our fifth wheel trailer, I need a thin walled socket for the lug nuts. A regular socket does not work. This is something you may also want to check in to.


Good luck and safe travels.


29 December 2017

Replacing The Door Handle on The RV Screen Door


Replacing The Latch On The RV Screen Door.


Broken latch on the RV Screen door.
Broken Latch On The RV Screen Door.
Stuff happens and this time I guess I'm a bit at fault. I think I might just have slammed the screen door a bit too hard and broke the latch.


I'm writing this blog post from Cathedral City, California. We have camp set up at Palm Springs Oasis RV Park. A great park, nice and clean and super nice swimming pools.


Back to the darn door. Last year when we were down here I had my head in the toilet, but that's a whole different story.


You can read about it on the "Head In The Toilet" post.


This one is a pretty easy job, at least I thought so starting out. First, though I called  Benlo Co. RV Service and supplies, located in Indio.


They are our go-to place down here if we need something. Can't say enough good things about them.


Sure enough, they have four different kinds. "Just bring your pice in and we'll see if we can match one up".


New Latch in Place. Note new self-tapping screw.
New Latch in Place. Note new self-tapping screw.
We drive over to them, about 13 km from the RV Park. We buy one that looks pretty close.


Back at the trailer, I start to install the new part and it is just a tad bigger than the old one.


One screw is in but I will need to either drill a new hole or use a self-tapping screw. I opt for the later.


It works just fine and we are back in business.


This is not a hard job to do and in my case, I just needed two screwdrivers to do the job.


Life is good

Cheers,

Anders


26 December 2017

Cleaning Your Bathroom Fan On Your RV


Super Duty Screen And Fan Cleaning In Your RV


Our RV Bathroom Fan.
RV Bathroom Fan
Cleaning your bathroom fan in your RV is often overlooked. It is important that you get into the habit of cleaning it.

If not, you will leave a lot of moister in your RV and then you create a whole bunch of other problems like mold etc. It's a good idea to run your bathroom fan every time you have showers, cook pasta, boil potatoes etc. You know what I mean.

It is further important to keep the fan clean for the motor not to work too hard. This is, of course, important when you are boondocking and want to consume less power.

We vacuum the screen on the fan every time we vacuum the rest of the trailer. This clears the screen pretty good but every so often you should do a deep cleaning.

Since there are many different types of fans each process will be a bit different.

Knob for raising and closing vent on top of trailer
If you have a knob like this to open and close the vent, it will more then
likely have a screw through the center of the knob.
On our fan, the actual screen pops out but for easier cleaning of the fan blades, I like to remove the cover completely.

For this you need is a screwdriver, in our case a Philips.

Depending on your unit, if it is like mine there is also a screw in the knob that opens the top flap.


After you got the assembly removed (it will still be attached to electrical cords) you just need some Windex and a rag. The dirtiest part of the fan will be the top of the fan blade that you can't see from down below.

Wet the rag with water and wring it out, then spray down one corner of the rag with Windex get it good and soaked.

Now wipe each fan blade. If you have not done this in a while you will have to rub a bit to get it clean. If it's really dirty you may have to rinse your rag out several times and add more Windex.

Once you got it all nice and shiny, put everything back together.

Cheers,

Anders


12 September 2017

Solar Shower For RV'ing


Solar Shower For Your RV


Solar shower in place on the rear ladder of our trailer.
Solar Shower in Place
If you have not yet purchased a solar shower for your RV it is time. Once you have used one you wonder why you waited so long.


Not only do you save on energy but also your holding tanks will not fill up as fast. This is especially true when boondocking or camping in parks with limited services.


Some people think that the water will not heat up fast enough. Worry no more, as long as you have a bit of sunshine the water keeps heating up.


In full sunshine you will have warm water in 3 hours. The water can actually get to hot, so check first and if it is hot, just add some cold water.


The Solar Showers are very affordable, starting at $10.00 (yes that's right, ten dollar) and go up from there.


Solar Shower
Solar Shower

We have two, Super Solar Shower, one smaller, 2.5 gallon and one larger, 5 gallon. Water is heavy so keep that in mind. Five gallons weigh in around 40 lbs. You do not have to fill up the whole bag, but a larger bag is nice not to have so you don't have to refill all the time.

A five gallon Solar Shower is enough for 3-4 showers. The smaller bag is also great for doing dishes and rinsing feet etc.


Deck and Balcony Tiles

Lay out the remaining tiles and use as stepping stones.
Remaining tiles makes great stepping stones.
Now, it can get a bit messy where you are standing having your shower, so what we did, we went to Home Depot and got some Deck & Balcony Tiles.


These plastic slotted tiles are 1 x 2 feet come in different colours. Five in a package.


They interlock with each other and no tools required to put together. We put two of them together for a platform to stand on when having the shower.


The other three tiles we use as stepping stones to get back to the out door carpet. This keeps the dirt off your feet and out of the RV.

Cheers,

Anders


04 February 2017

Preventing RV BBQ Flare up


Tip for preventing flare up on your RV BBQ


RV BBQ Ready to go. In Organ Pipe National Monument, Arizona.
Most BBQ's that come with RV's are pretty small and most come with only one burner.


This makes it hard to cook meat that has more fat in it, like a pork roast of even half a chicken with bone in and skin on. The flare up can be a real pain.


The little BBQ we have on our 5th wheel is a good little BBQ but again it has only one burner and cooking one of my favourite "half chicken with bone in and skin on" can be a challenge to say the least.


What I do to prevent flare up is use tin foil to make a little "pan". I use the heavy duty tin foil you can buy at Costco. It is really good and strong.


Take about 18 inches and fold in to a size that fits the meat you are going to BBQ.


If you cook two large chicken breast, bone in and skin on, make two pans to fit each chicken breast.


When you fold the tin foil make sure the shiny side is up to reflect more heat. Make little edges so the grease will not run off and cause more flare ups.

Whole Breast of Chicken, Bone in, Skin on. A Small Tray For Each Chicken Breast.

Asparagus cooking in trays with the left over fat from the Chicken. Just cook till crisp.

A glass of rosé wine goes just great with chicken.
Once your chicken is cooked wrap it in some more tin foil and let sit 10 min or so. It will continue to cook.


Now if you have some asparagus ready, throw them on the BBQ in the grease that's left on the pans or trays.


Cook till crisp, don't over cook.


Match this wonderful chicken with a nice glass of Rosé. Serve chilled.


Well, I hope that works for you.

Cheers,

Anders

16 January 2017

Replacing Battery And Propane Vents


General Maintenance of Your RV - Replacing The Battery Box Vent and Propane Compartment Vents


Cracked Vent
As your RV gets older and it is exposed to the elements some of the plastic just cracks and need to be replaced.


This was the case with two of my three vents.


I have one for each propane tank and one for the batteries. They are often referred to as Battery Box Vents.


This is a pretty easy job and can be done in less then half an hour.


Stuff needed for this job:
  • Philips Screw driver
  • Flat Screw driver
  • Caulking gun
  • Caulking
  • Paper Towel
  • Spray Nine cleaner or Windex

Cleaned up vent hole on trailer for the battery box vent
Cleaned up vent hole on trailer

New Battery Box Vent in Place
New Battery Box Vent in Place.
Remove the four screws holding the vent in place and put to the side. You will need them again.


If the vent does not come off, grab the flat screw driver and from the side give it a gentle tap and it will fall off.


Remove any excess old caulking. I found that the flat screw driver works well, just gently scrap it off or use a plastic scraper of some kind.


Clean off with cleaner and paper towel. Let it dry.


In the meantime, turn the new vent upside down and put a bead of caulking close to the outside edge and completely around the four holes.


Install the vent and as you tighten the screws up the caulking will ooze out on the sides.


Make sure not to tighten it to much. The plastic will crack.

You can clean up the excess caulking or leave it, your choice.

Cheers,

Anders


Head in The Toilet. Aqua Magic Style ll Water Valve


Changing The Water Valve in Aqua Magic Style 2 Toilet. Part # 42049
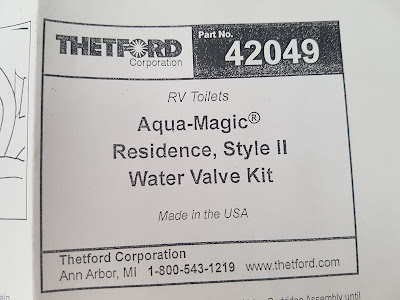

Aqua Magic Style II Water Valve Kit
Instructions for Aqua Magic Style 2 Water Valve Kit

Sometimes things on the RV or in our case the 5th Wheel Trailer breaks down.

In our case the water valve in the RV toilet would not shut off. The water just keeps running.

This happen to us after sitting for several months and not being used.

It was actually just before Christmas and we had several of our kids and grand kids coming up and we needed the extra space in the trailer.

I filled the trailer up with water and then turned the pump on and the water in to the toilet just kept running.

Living on a small little Island in the Pacific Ocean there was not a hope of getting a new valve for the toilet.

So what I did in the meantime was to install a brass shut off valve on the waterline.

This way the toilet could still be used. A bit of a pain having to shut the water off manually, but way better then not having a toilet at all.

We had a trip planned to California and Arizona starting New Years Day. I could always pick up a water valve there or on the road down some place.

Actually as I am writing this blog post we are camped at Palm Springs Oasis RV Park in Cathedral City, California. This is a very nice park by the way.

I got the water valve for the Aqua Magic Style II, part number 42049 from a local dealer here in the Palm Springs area called Benlo Co. RV Service and supplies. Very good and efficient.

This is what you need for the repair:


Stuff needed for the repair job of the Aqua Magic Style 2 toilet
Stuff needed for the repair job.
  • The Aqua Magic Style II replacement kit. Part number 42049. Comes with instructions.
  • Three large Garbage Bags
  • A set of latex gloves
  • Head lamp or flash light
  • Plumber Pliers
  • Needle Nose pliers
  • ½ inch Wrench
  • Philips Screwdriver
  • Flat Screwdriver
  • Vaseline
  • Phone and or Digital Camera
  • Roll of Paper towel or Rags
  • Towel
  • Spray Nine or other disinfectant cleaner
Have a good look at your repair kit/water valve kit. Make sure all the pieces are there. When you dismantle the toilet take pictures as you go. They will come in handy if you forget some steps. If you have lots of room beside your toilet (on the Pedal side) you do not need to remove the toilet. However most bathrooms in RV's are pretty tight.

Removing the Aqua Magic Style II Toilet:

  • Before you start, spread a large plastic garbage bag on the floor. 
  • Clean out toilet well, empty the black tank and flush well. Add deodorizer and whatever liquid you use for the black tank. Use Spray Nine and clean the toilet well. 
  • Turn off water pump or disconnect water supply. Drain all water inside using the Pedal.
  • If you have a pressure tank installed like I do, make sure to drain/release all the pressure in the lines or close by pass valve.
  • Disconnect the water supply to the toilet. You may need a set of pliers or plumber pliers for this. Put some towels around the supply line to catch any water coming out.
  • Using the flat screwdriver pop off the plastic caps covering the Flange Nuts.
  • Grab the ½ inch wrench and remove the Flange Nuts. Note that these nuts are not super tight. Important when you install it back again.
  • Lift the toilet straight up and lay it down on the garbage bag on its side, pedal side up.
  • Use second garbage bag to cover the hole in the floor.
Toilet removed. Note brass water valve I
installed on the water line at the back of the toilet.


Now is a good time to take some more pictures even from the bottom side so you can see how the Closet Flange Seal fits on to the bottom of the toilet.... I know it may not look pretty.


Removing the Aqua Magic Style ll Water Valve.

Grab handle and make a quick jerk for  the handle to come off.
Grab handle and make a quick jerk for
the handle to come off.

  • With the toilet laying on its side, use your left hand holding the toilet bowl, grab the pedal with your right hand and give it a quick jerk up and off. I know what you are thinking, you are going to break the darn thing, but not so. Just give it a good pull and it will snap off. Put it to the side.
  • Take some more pictures of what you see.
  • The next step seems impossible but it works.... using your right hand, put your thumb in to the depression of the valve, fingers under the retainer, lift slightly and turn clockwise and it will come off just like that.
  • Put to the side. I use the sink (close drain) or shower to put all the stuff in. Another picture maybe
  • Grab your needle nose pliers and remove the Water Inlet Seal and compression spring (this is the sucker that caused the problem to start with). Put to the side.

Installing The New Aqua Magic Style II Water Valve

Close up of the Water Valve Cartridge Assembly. Note you will not have the brass valve on the far left. I installed that to be able to turn the water off
Close up of the Water Valve Cartridge Assembly. Note you will not have
the brass valve on the far left. I installed that to be able to turn the water off
  • Using the Philips screw driver, insert the new Water Inlet Seal Assembly. The Spring only goes or fits one way in to the seal assembly.
  • Put a tiny bit of Vaseline on the O-Ring on the Valve Cartridge.
  • Insert new Water Valve Cartridge Assembly until fully seated. Note, if the Water Valve Cartridge Assembly is apart the Valve pice fits in to the Cartridge from underneath not from the top. Also make sure the O-Ring has not fallen off. It makes a big mess when you turn the water back on again. Yes I did experience this.
  • Rotate retainer until it clicks in to place.
  • When installing the pedal back in to place, you will need a bit of patience... a bit of swearing helps as well.
  • Place Water Valve Arm in closed position.
  • You have to make sure the arm lines up in three places. First the Water valve arm and the spring pedal pivot, then you push down (like you would step on the pedal) a bit and the drive arm pin fits in. 
  • Once in place keep pressure on it and then give it a good whack. It will snap in to place.
  • Set toilet up on plastic bag and operate the pedal several times making sure the waste ball opens and closes properly. If the pedal falls off you screwed up, do it over again. I'm talking from experience here.
Once you have it all back in to place it is time for dirty work and time for the latex gloves, just slip them on..... and pretend you are a doctor doing a prostate check.

Remove the old Closet Flange seal and discard in third garbage bag. Using rags or paper towel clean out the flange. This is the time when you also clean out the floor area where the toilet sits on and the Closet Flange Seal meets the floor area.

Installing Aqua Magic Style II toilet
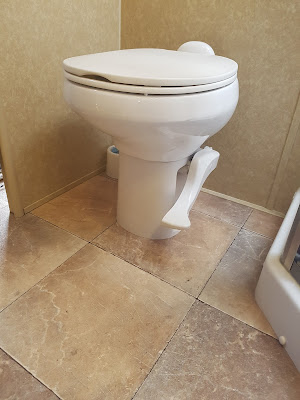
Aqua Magic Style 2 water valve installed, toilet in place.
  • Install the Closet Flange Seal on the toilet itself. Lip side down.
  • Remove plastic bag from opening in the floor.
  • Remove and discard latex gloves.
  • Lift up toilet and align the flange bolts when gently setting it down. Now have a good look at which way the toilet is facing. You have some room for adjustment here. Turn it one way or the other to make it fit best for your bathroom.
  • Tighten the Closet Flange Nuts...... IMPORTANT. Do Not Over tighten. The Flange will break if you get to rough with it. Just tighten it till the toilet does not rock any more.
  • Replace the nut/bolt covers
  • Hook up the water lines again
  • Turn on water and flush the toilet several times and check for leaks.
Thats it, your done!  After a week or so check for leaks and make sure the toilet is not lose or rocking.

Cheers,

Anders


15 October 2016

Boondocking


Boondocking or Camping Without Services.


Enjoying dinner with friends while boondocking on Coyote Beach, Baja Mexico.
Boondocking or camping without services is a lot of fun but you should be prepared. If you plan to boondock there are certain things that will be very nice to have.

On our fifth wheel we had a solar system installed. The system we have is by GoPower and is called Solar Elite. We had it professionally installed.

The system includes:

  • Two 160 watt panels for a total of 320 watt.
  • 2000 watt pure sine wave inverter for AC power
  • 30 amp pulse width modulate digital regulator
  • 45 amp smart battery charger
  • 30 am pre-wired automatic shore power/inverter AC switching kit
  • DC inverter install kit
  • Inverter remote on/off
  • 50 ft of MC4 output cable and all mounting hardware.

Inverter installed on the wall in the pass-through compartment.

Remote in the trailer to turn the inverter on.

Two solar panels on the roof of our trailer. Nice to have when boondocking.

Another view of the inverter in the pass-through
Another view of the inverter in the pass-through, part of our solar system

We now have four of these 6 volt batteries. Lots of storage for boondocking

Our trailer from above showing the solar panels on the roof. A must for boondocking
Our trailer from above showing the location of the solar panels on the roof.
We also installed two new 6 volt deep cycle flooded batteries. This year we have added another set of batteries and now have four 6 volt batteries. This will be sufficient for most campers.


If you have an RV that is older then 2015/2016 (like we do) you should definitely change all the lights to LED lights, this will make a hugh difference.


Go through your RV and see how many you need and order them on Amazon or where every you prefer to shop. You will be surprised at how many lights there are in your unit.


Having some kind of solar system is pretty well a must if you plan to do a lot of boondocking. If you don't, you pretty well have to run your generator every day and it might not be appreciated that much by others if it goes on for longer periods.


With our system we run our Nespresso coffee maker, hair dryer, TV, computers and just about anything.


It is really nice to just turn one switch and there is power in every outlet.


We often camp on Coyote Beach ( Baja Mexico). At the beach there are two local fellows that will sell you water, but otherwise there are no services.


The "water man" provide you with a 45 gal plastic barrel and comes and fills water when you need it. The cost is about US $10.00 per fill. You then have to have some way of pumping the water into your RV if you use a RV.


A 12 volt pump will do that just nicely. We added a 1/4 of a cup of bleach to each tank we filled up. We do not drink this water, but use it for all cooking.


If you don't have water readily available you have to have some other way of getting water to your RV. This can be as simple as a bucket and carry water from a creek.


What else do you need? You will need a blue boy or grey boy. This is a little wagon to transport your waste water away. We have a SmartTote LX 4-Wheel waste tank. Ours is the 27 gallon one.


Our trailer, boondocking on Coyote Beach

Gray water disposal setup.
If you are considering the 35 gallon one, remember even the 27 gallon is very heavy (225 lbs) when it is full and can be tough slugging in sand and soft ground. Better to make two trips or empty more often.


On Coyote Beach you dump the black water into the outhouses and rinse with the grey water.


Many people will dig a pit by/under the RV for the grey water and keep it covered with palm leaves.


Before you discard wastewater of any kind, make sure to know what the rules are in that area and do it responsibly.


When you boondock you learn quickly to conserve water and power. There are many ways of doing this. Use a small plastic container for doing dishes. Use a solar shower bag for rinsing off when you come out of the water or otherwise having a shower. Take sponge baths instead of showers and I'm sure you can think of a few.

Life is good....

Boondocking at it's best. Coyote Beach, Baja Mexico
Boondocking at it's best.


12 February 2016

Leveling Your RV


Leveling Your RV, Front, Back, Right and Left


Our trailer parked in Los Barriles, BCS. on sloping ground.
How important is it to have your RV level? This really comes down to your comfort level.


If it is just for one night, and you are on the road the next morning, well you can probably sleep through a tilted unit.


For some RV owners leveling the unit is not an issue. Their coaches are self leveling and have all kinds of fancy controls.

RV set up on strong sloping grade.

View from the back of the trailer. RV set up on sloping grade.
For those of us who have a trailer of some kind, leveling is a whole different kettle of fish.


If you campsite is a cement pad then most of the time you only have to worry about front and back leveling.


This is easy to do with your landing gear on a fifth wheel trailer, or the tongue jack and the smaller jacks on a travel trailer.


When you camp on the beach or a camp ground with gravel, dirt or sand surface, most of the time you will have to level from right to left (or passenger to driver side) or left to right.


I assume you have a small level attached or glued on somewhere where it is easy to see.

Digging a hole or removing dirt on the high side makes leveling an RV easy
We installed one just inside the door where it can be easily seen from the outside (with the door open) without having to walk into your unit (I'm thinking if it is raining and muddy).

Now consider this if you are two inches high on the driver side of the trailer, most of us put these plastic leveling pads out and back up the trailer on them. Now this is fine and fast and easy. 


Liz in San Juanico, BCS overlooking Scorpion Bay
Leveling your RV. Digging out small holes for the high side of the trailer makes is very solid.
Digging out small holes for the high side of the trailer makes is very solid.

Use leveling blocks to shorten the landing gears and jacks when leveling your RV
Use leveling blocks to shorten the landing gears and jacks when possible.
However if you are going to stay in the same place for any length of time, you may want to consider digging or removing some of the sand/gravel/dirt with a shovel and lower the high side.

Why?

Well, first of all, the lower the trailer sits the less rocking or movement you will get. We actually dig out holes for the wheels to go into when boon-docking or camping in areas with softer ground surfaces.

We have a tandem axle on our trailer. It is surprising how much more solid the trailer feels when you dig two holes for the tires to fit into.

When you back up the trailer on 2-3 inches of plastic leveling pads or 2 x 8 boards, you raise the center of gravity, and you get a lot more rocking and movement of the trailer.

With a 5th wheel trailer the front jacks or landing gear will also add to the rocking. Here is where a good leveling block comes in handy. You can make one yourself or purchase a set from your local RV store.

The shorter you can keep your front jacks or landing gear the less rocking you will have.

Hope that helps.


30 August 2015

Adding a Pressure Tank to Your RV


Installing a Pressure Tank in my RV


Pressure tank in place with cradle and tie down.
I decided to install a small pressure tank in our 5th wheel trailer. The benefit of having a pressure tank is that the pump does not always kick in and out as often, resulting in less noise.

Also for us we do a lot of dry camping and we can have access to lots of water with out running the pump in the evenings and when using the washroom at night. Saves battery power when the solar panels are not working.

Pressure gauge and valve in place.
First I decided on a place to put the tank where it is easy enough tie in to the current water line. The tie in should be on the pressure side of the pump.

For us it worked best in an area that was blocked off and not used at all in the pass-through compartment or what I call the "underbelly". This area is within 2-3 ft of the water pump.


Since there was no pressure gauge anywhere in the RV showing the water pressure, I decided that this would be a good time to add one. A valve also seemed to be in order so I could by pass the pressure tank if need to be.


After measuring and figuring out what pluming parts were needed I headed off to the local plumbing shop. I even brought along the hose on the pressure side of the pump that goes from the pump to the filter (this is where I decided to tie in the pressure tank).


I purchased a 4.8 gallon tank, pressure gauge, a valve, all the fittings and a 3 ft chunk of hose.


These kind of pressure tanks can be installed laying down and that worked best for me. I made a little cradle so the tank can not move around and added a couple of hooks for the tie-down.

Added a "T" to tie in to the current water line
Added all the fittings with lots of Teflon tape. When it came to tying in to the existing water line and adding the extra piece of hose, I put the hoses in some hot water for a few minutes, they are then much easier to work with.


Everything hooked up and tightened up it was time to turn the water on. Must have done something right, no leaks.


Panel installed back in to place. All that is showing is the pressure gauge.
The pump cycled and the pressure came up to 40 psi. This was perfect for me since the pressure tank comes pre-charged to 38 psi.

When installing a pressure tank like this the charge in the tank should be 2 psi below where the pump cuts in (according to manufacture recommendation). In my case 40 psi.

If you have to change the pre-charge in the tank, make sure to have no water pressure on the other side. The air valve stem is on the top or opposite side of the water intake. Use your compressor to add more air or press the valve to release air. Just like on a tire.

The cost for material for this project is under $200.00

It all seems to works well. Will keep you posted if I have to change anything.

Good luck with your project.


08 August 2015

RV Bathroom Solar Night Light


Solar Night Light for the Bathroom in our RV


Solar Light to be installed in RV as a Solar Night Light.
When camping, it is nice to have a night light on in the bathroom without having an extra draw on the batteries in your RV. Even if you have a full hock-up it is nice to have a night light in the bathroom.


This is especially true when "Dry Camping" without any services. Every extra Amp hour in the battery becomes so valuable.


To accomplish this, I have to have sunlight to charge the solar battery.


The bathroom skylight looked like a good candidate.


The skylight has a "bubble", the top/outside glass and also an inside glass (it's all plastic).


The sky lite in the bathroom in our RV
The skylight in the bathroom in our RV
There is about 3 inches between the outside and inside glass. This is where I decided to install a solar light.


So what I did, I went to Walmart and picked up a few garden solar lights at $1.00 each.


The kind I'm talking about, are the ones that sits on a stick and are meant to be put along the walkways in your garden.


I then removed the actual stick from the light. But, I did not want the light to shine outward, but rather downward.


So I looked around my shop to see what I could find. I had two hard white plastic rolls (from a rolls of reflective tape).


I glued them together and then inserted the solar light.


Solar light with stick removed and the two plastic pipes for the RV  Night Light.
Solar light with stick removed and the two plastic pipes for the RV
Night Light.

The two plastic pipes glued together to fit the RV solar night light
The two plastic pipes glued together to fit the solar light

Inserting the solar light in the plastic pipe for the RV solar night light.
Inserting the solar light in the plastic pipe.

Light sitting in the plastic pipe.
RV Solar Night Light in Place
I then inserted the solar light inside or just on top of the lower glass and screwed the glass back in.


This worked very well, the light just nicely fits inside and is the correct size to fit in-between the top and bottom glass in the sky lite.


This makes life just a bit easier when camping.