google.com, pub-1183232341631896, DIRECT, f08c47fec0942fa0 We Discover Canada And Beyond: 2015
My RV Cook Book, "Tinfoil Cooking" is now published on Amazon!

Check it out Amazon.ca, Amazon.com, Amazon.de, Amazon.co.uk or any other site worldwide! For a luxury coilbound version on 80# stock go to my cooking website AndersCooks.ca


21 December 2015

Baja Mexico Trip 2015-2016 Part 1


Cortes Island, BC to Ensenada, Mexico.


On the Cortes ferry to Quadra Island

Travelling Southbound on the inland Island Highway, Vancouver Island, BC
It is the 29th of October 2015, and we are finally on the road. It is raining cats and dogs and the Cummins Diesel motor in our truck is growling like never before (at least that's what I think).... We are heading south!


If you plan to head into Mexico for holidays make sure to have all your car, truck, trailer, and boat insurance in place.


Also you need your FMM or tourist visa and fishing license. Anyone being on a boat that has fishing gears on it mush have a fishing license.


We are members of Vagabundos Travel club out of San Diego, CA and they are super nice and helpful.


They will arrange it all for you, just take out a yearly membership and tell them what you need including your visa number and they will get it all for you.... please allow some time.


You will have to give them a date when you will cross the border in to Mexico and at what border crossing. It does not have to be an exact date, you just can't go before the specified date, but later is OK. Your Canadian or at least BC insurance does not cover anything in Mexico.

Everything is well groomed at Burnaby Cariboo RV Park, just outside Vancouver BC
The first night we arrive late in Vancouver and check in at Burnaby Cariboo RV Park for two nights. This is a great campground. The second night we have family over for a BBQ and got some hugs from the grand kids.

Driving through Seattle Washington in the rain.
Driving through Seattle Washington in the rain. 
On the 31st of October we are on the road bright and early and cross the USA border in to Washington State, still in the pouring rain.


Driving southbound on the I -5 (US Interstate 5 Highway) there is too much water on the road to safely use the cruise control.


All of a sudden the washer fluid does not work..... the pump hums away but nothing is coming out! I just filled it up?


We stop at one of the rest stops and after crawling around under the truck I can see the hose is broken inside the passenger side fender.

Anders fixes the broken hose with Duck tape.... don't leave home without it.
Duck tape fixes everything.... Don't leave home without it!
I can't get my hand in to fish up the hose ends, but Liz comes to the rescue and brings out a ladle from the trailer and with the little hook on the end I can now fish it out. Several rounds of duck tape and we are back in business. I am now totally soaked from crawling under the truck and all the rain coming down.... actually we both look like two wet rags!


Driving over the Columbia River to get in to Portland, Oregon.
Driving over the Columbia River to get into Portland, Oregon.

It is more like a waterfall then a rainfall in Portland Oregon
It is more like a waterfall then a rainfall

It is a mess out there, roads have a foot of water on them.
It is a mess out there, roads are flooded

We are now ready to stop at the first rest stop south of Portland Oregon.


Late afternoon we arrive in Portland, Oregon. The skys have now opened up and it is more like a waterfall then a rain fall.


Driving through Portland, many off ramps are flooded and vehicles stranded..... well we sure got the under carriage of the truck and trailer washed down.


At the first rest stop just outside Portland we pull over and decide it is just raining too much to continue, and is no longer safe to drive.


We make some supper, have a glass of wine and are cozy warm in the trailer with the furnace blasting away.


The next morning we wake up to..... you guessed it, more rain. After a quick breakfast and coffee we are back on the I-5.


Mount Shasta, California

Shasta Lake or reservoir.
Once we cross the border into California the rain is easing up, the clouds are lifting a little, and now we can use the cruise control. After a long day of driving we arrive in Orland, California.


We check in at Parkway Resort and Campground, just short of one km from the freeway. This is a very well run campground with full services and a very nice setting.


Located far enough away from the I-5, so no road noise. There is another campground right by the highway, but we felt we would get too much road noise there.


The following morning we are back on the road. We are steadily driving all day long, all the way to the town of Lebec just north of Los Angeles in the high country.


We camp at a truck stop, and go out for supper at the Mexican Restaurant  next door. We make it an early night..... Mexico tomorrow.


We are on the road early heading for Mexico. The I-5 between LA and San Diego get's crazy busy, 5 to 8 lanes going each way, and people driving like crazy. Again, Liz comes to the rescue, she gets me off this crazy freeway onto a highway less busy. We eventually arrive at our border crossing at Tecate. This is a great little border crossing, the staff is super friendly.

We drive in, and they would like to see registration for both the trailer and the truck. They compare "vin" numbers and have a look inside the trailer. They say OK, we smile and ask for "Immigration" to get our tourist visas (FMM) stamped.... this is a must! They point us in the direction of an office and we walk over and in. There we meet a nice man, and he scans our passports and stamps our paperwork.

Liz and Anders in the Central Valley in California
Right after the border into Mexico, there is a detour...... well with the trailer behind and the small narrow streets it makes for some creative driving. Watch for all the stop signs, they are not all in the same places, some are in almost hidden places.

Ruta Del Vino or the Wine Route
Ruta Del Vino or the Wine Route, south of Tecate, Mexico

Wonderful scenery.
Wonderful scenery.

Camped at Esterio Beach Resort in Ensenada Mexico
Esterio Beach Resort in Ensenada Mexico

Sunset at Esterio Beach Resort and RV Park, Ensenada Mexico
Eventually we are on our way out of town and take the Wine Route or "Ruta del Vino & Valle de Guadalupe  After about two-three hours of driving, we arrive in Ensenada and check in at Estero Beach Resort and RV Park. A wonderful place right on a lagoon on the Pacific ocean. So nice, feels almost like coming home. We book three nights.  We have a nice supper in the resort restaurant with a bottle of wine. Great food.

For more pictures from this part of the trip check out our web album.

Safe travels

More in Part 2

30 August 2015

Adding a Pressure Tank to Your RV


Installing a Pressure Tank in my RV


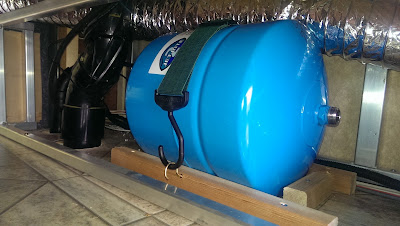
Pressure tank in place with cradle and tie down.
I decided to install a small pressure tank in our 5th wheel trailer. The benefit of having a pressure tank is that the pump does not always kick in and out as often, resulting in less noise.

Also for us we do a lot of dry camping and we can have access to lots of water with out running the pump in the evenings and when using the washroom at night. Saves battery power when the solar panels are not working.

Pressure gauge and valve in place.
First I decided on a place to put the tank where it is easy enough tie in to the current water line. The tie in should be on the pressure side of the pump.

For us it worked best in an area that was blocked off and not used at all in the pass-through compartment or what I call the "underbelly". This area is within 2-3 ft of the water pump.


Since there was no pressure gauge anywhere in the RV showing the water pressure, I decided that this would be a good time to add one. A valve also seemed to be in order so I could by pass the pressure tank if need to be.


After measuring and figuring out what pluming parts were needed I headed off to the local plumbing shop. I even brought along the hose on the pressure side of the pump that goes from the pump to the filter (this is where I decided to tie in the pressure tank).


I purchased a 4.8 gallon tank, pressure gauge, a valve, all the fittings and a 3 ft chunk of hose.


These kind of pressure tanks can be installed laying down and that worked best for me. I made a little cradle so the tank can not move around and added a couple of hooks for the tie-down.

Added a "T" to tie in to the current water line
Added all the fittings with lots of Teflon tape. When it came to tying in to the existing water line and adding the extra piece of hose, I put the hoses in some hot water for a few minutes, they are then much easier to work with.


Everything hooked up and tightened up it was time to turn the water on. Must have done something right, no leaks.


Panel installed back in to place. All that is showing is the pressure gauge.
The pump cycled and the pressure came up to 40 psi. This was perfect for me since the pressure tank comes pre-charged to 38 psi.

When installing a pressure tank like this the charge in the tank should be 2 psi below where the pump cuts in (according to manufacture recommendation). In my case 40 psi.

If you have to change the pre-charge in the tank, make sure to have no water pressure on the other side. The air valve stem is on the top or opposite side of the water intake. Use your compressor to add more air or press the valve to release air. Just like on a tire.

The cost for material for this project is under $200.00

It all seems to works well. Will keep you posted if I have to change anything.

Good luck with your project.


08 August 2015

RV Bathroom Solar Night Light


Solar Night Light for the Bathroom in our RV


Solar Light to be installed in RV as a Solar Night Light.
When camping, it is nice to have a night light on in the bathroom without having an extra draw on the batteries in your RV. Even if you have a full hock-up it is nice to have a night light in the bathroom.


This is especially true when "Dry Camping" without any services. Every extra Amp hour in the battery becomes so valuable.


To accomplish this, I have to have sunlight to charge the solar battery.


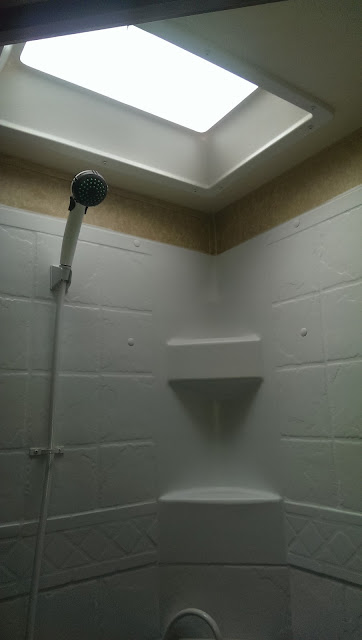
The bathroom skylight looked like a good candidate.


The skylight has a "bubble", the top/outside glass and also an inside glass (it's all plastic).


The sky lite in the bathroom in our RV
The skylight in the bathroom in our RV
There is about 3 inches between the outside and inside glass. This is where I decided to install a solar light.


So what I did, I went to Walmart and picked up a few garden solar lights at $1.00 each.


The kind I'm talking about, are the ones that sits on a stick and are meant to be put along the walkways in your garden.


I then removed the actual stick from the light. But, I did not want the light to shine outward, but rather downward.


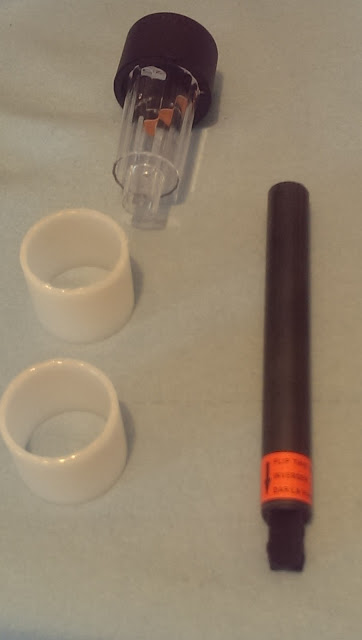
So I looked around my shop to see what I could find. I had two hard white plastic rolls (from a rolls of reflective tape).


I glued them together and then inserted the solar light.


Solar light with stick removed and the two plastic pipes for the RV  Night Light.
Solar light with stick removed and the two plastic pipes for the RV
Night Light.

The two plastic pipes glued together to fit the RV solar night light
The two plastic pipes glued together to fit the solar light

Inserting the solar light in the plastic pipe for the RV solar night light.
Inserting the solar light in the plastic pipe.

Light sitting in the plastic pipe.
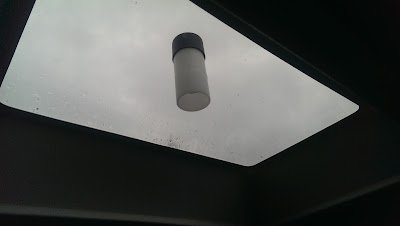
RV Solar Night Light in Place
I then inserted the solar light inside or just on top of the lower glass and screwed the glass back in.


This worked very well, the light just nicely fits inside and is the correct size to fit in-between the top and bottom glass in the sky lite.


This makes life just a bit easier when camping.


14 July 2015

Replacing Link Kit in Glide Ride Pinbox


Glide Ride Pinbox - Link Kit Replacement


Glide Ride Pin Box
Glide Ride Pin Box

Back up your truck and use an adjustable utility table
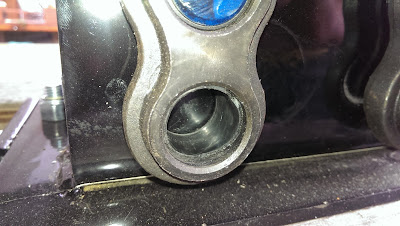
When I installed my new Glide Ride Pinbox, I noticed that two of the plastic bushings that fit into the Link Kit were broken.


I'm not sure how that had happened. The only thing I can think of is that when the pin box was being assembled, someone hit the "Glide Ride Pin Assembly" way to hard, and it was not properly lined up; therefore breaking the bushings.


King pin lowered on table by using the front jacks.
Contacted my dealer and the parts came in short time and were of course replaced under warranty.


When I talked to Demco they said that they only sell a complete Link Kit ( four links and four bushings). However I only received the plastic bushings.


Plastic bushings that fits in the Link Kit in the Glide Ride Pin box. Two new and two broken.
Two new bushings and two broken
Before we go any further here is the parts list in a pdf file format, just so you know what I'm talking about. All the parts that are in quotation marks ( " ) correspond with this parts list.


Use the camera on your phone to take pictures as you go along. This will help if you not to get delayed at all.


OK, we are set to go to work. So the way I did it, I backed up the truck and set an adjustable utility table on the tail gate.


Then I used the front jacks on the trailer to lower and raise the pin box, so when I removed the "Glide Ride Pin Assembly"  the "Glide Ride King Pin Base" would not just drop down.


It is not super heavy but it is a bit awkward to handle, especially when you install it back in again.


If you do not have a table like mine where the king pin fits in the middle, use a flat small table and make a small frame with some two by fours.


The "Glide Ride King Pin Base" is now just touching the table and it is time to remove the "Serrated Flange Bolt", one on each side of the pin box. These bolts are really torqued up so warm up your biceps or do what I did, use an impact wrench.

Use flat screw driver to get pin assembly out.
Use a flat screw driver
Once you have removed the "Serrated Flange Bolts" it is time to remove the "Glide Ride Pin Assembly".


There is a "Pin Assembly" on each side of the pin box. The "Pin Assembly" holds the whole "King Pin Base" in place.


Removing Pin Assembly on Glide Ride Pin Box.
Work from side to side (front - back) removing the Pin Assembly
Take your time removing these pins. You more then likely have to use a flat screw driver to get them started, working from side to side, just work back and forth easy.


Once you have the "Pin Assembly" remove on both sides the "King Pin Base" will sit nicely on your table and the "Link Kit" will be partly exposed.


Broken bushing in Link Kit on my Glide Ride Pin box
Broken bushing in Link Kit
Use the jacks on the trailer again to raise the pin box up.


Now take some more pictures so you see how the "Link Kit" is put together, especially how the plastic bushings are installed, top and bottom is opposite.


Pin Assembly removed from the Glide Ride Pin box
Once you have the "King Pin Base" removed and resting on the table and the pin box lifted up you can easily take each link off and inspect the bushings.


When you have replaced the bushings or the whole "Link Kit", lower the pin box down again.


Just go really easy when you lower the pin box down  so you do not damage the "Link Kit" or the "Urethane Bumpers"

Once you have the "Pin Assembly back in place, it's time to insert the "Pin Assembly". Go really easy here, just nice gentle little taps. Do both sides the same, a little bit at the time.

If you hit the Pin Assembly to hard you will more then likely crack the plastic bushings in the "Link Kit".

Now then you have the "Pin Assembly" in place, it is time to torque up the Flange Bolts. I contacted Demco - Glide Ride to see how much it should be torqued to and they said 80 ft lb.

If you have any questions, just contact me using the contact form on the left hand-side.

Camping in Rathtrevor Provincial Park, BC. Canada


03 May 2015

Replacing the Lippert Pin Box with a Demco Glide Ride Pin Box


Lippert Pin Box to Glide Ride Pin Box


The old Lippert Pin Box
So I decided to replace the old Lippert Pin Box and install a new Demco Glide Ride Pin Box.


It all looked fairly simple and I had adjusted the Lippert Pin Box before, so I knew that it was not to heavy. It just looks like it.


Blue Steel. This stuff is magic.

Blue Steel painted on to the pin box frame
Blue steel painted on.
First I took a bunch of pictures, especially where it is attached, this way it would make it easy to install the Glide Ride in the same bolt holes, by having a look at the pictures.


That really worked well for me.


I had another look, removed the break away switch and decided to back the truck up and drop the tail gate down on the truck deck.


This way I could loosen all the bolts off, carefully remove all the bolts except the back bottom two.


Now the Lippert pin box just nicely flipped down on to the tailgate hanging from  those two bolts. (sorry I did not get a picture of it hanging down)


Once the  pin box was supported on the tailgate it was easy to remove the last two bolts.


I cleaned up the frame where the pin box attaches, painted some "Blue Steel" on. Blue steel is one of my favourite paints.


Removing the link assembly. It is torqued to 85 lbs.

Removing link assembly and king pin plate.
You clean up the steel surface the best you can (not all rust has to be removed) paint on the Blue Steel (goes on like cream) on and it eats the rest of the rust up.


When it has dried, paint with the appropriate colour.


To install the Glide Ride pin box, I did everything in reverse. I did spray a bit of "Dry Slide" on the new Glide Ride pin box so it would fit in easier. The Glide Ride pin box is a lot heavier then the Lippert.


Once the two bottom back bolts were in, it was easy to lift up the pin box and install the rest of the bolts.


Capture Plate in place

One hole drilled for the capture plate.
Make sure to torque to manufacture specifications.

My Demco HiJacker hitch with one capture plate removed.

Blue Steel touch up on rusty spots

New Demco Glide Ride Pin Box in Place
New Demco Glide Ride Pin Box in place.
Since I have a Demco - HiJacker Auto Slide hitch on the truck I had to install a capture plate on the new Glide Ride Pin Box.....


a bit scary to start drilling holes in the new King Pin Plate.


The instructions that came with the capture plate were good, so it all went well.


After that, I had to remove the old capture plates on the HiJacker hitch.


At the same time I cleaned the hitch off. I primed the bare/rusty spots with Blue Steel and then painted it black.


All went well, looking forward to giving the new Demco Glide Ride Pin Box a good try next week.

Happy Trails,

Anders

01 May 2015

Yukon and Alaska Bound, Part 47. Fort Nelson to Dawson Creek, and Home to Cortes Island, British Columbia


Drive From Fort Nelson, Dawson Creek, to Our Home on Cortes Island, BC.


Anders and Liz in Dawson Creek, British Columbia, Canada.
Driving south from Fort Nelson

Peace River
Peace River
If you want to start from the begining of this trip go to part one.

We are crossing Peace River in British Columbia
It was the 16th of August 2014 and we were making a quick stop in Fort Nelson to pick up some more drinking water, and then we were on the road again.


The roads were in very good conditions, but the drive along here is rather boring.


Some hills in the distance and then the scenery changed. South of Fort St. John the bridge and valley of the mighty Peace River is very impressive.


As we came closer to Dawson Creek the smoke from the forest fires became very strong and annoying.


We checked in at Northern Lights RV Park, about a mile outside Dawson Creek. It is well run, not spectacular but OK.


After we set up camp we went back in to town again.


Liz went to the Dawson Creek info center and watched the movie about the construction of the Alaska Highway. Amazing


I went to the closest car wash and gave the truck a good wash.

Back in camp we tossed some burgers on the BBQ and had a glass of wine. Life was good.


Dawson Creek to Lac La Hache


Camp set up at Lac La Hache Provinical Park. Wonderful.
In the morning of the 17th of August, Liz and I had a "Pow Wow" and came to the conclusion that the smoke from all the forest fires were not going to go away anytime soon. It was time to go away from this polution.


The northern Rockies are beautiful, but not in smoke. It was time to go south, in the direction of home.


We got on the road and the smoke just got worse and worse. Getting closer to Lac la Hache Provincial park the smoke seemed to ease a bit, and we set up camp in this beautiful park.

Lac la Hache
Lac la Hache

Liz at Lac la Hache
Liz at Lac la Hache
We went for a nice long walk down to the lake. After we had a nice camp fire, might as well make some more smoke :)

That evening we savoured some of the smoked/dried salmon we were given earlier on our trip at the Teslin Native Centre.


The rear differential seal on our truck was leaking, so I had to top it off with some oil. The cause of the leak was later fixed with the replacement of the back universal joint.


Lac La Hache to Fort Langley


On the 18th of August we woke up fairly early, after we both had a really good night's sleep, even though the smoke became much worse over night.


I was not very comfortable with the problem with the u-joint and the leaking seal.


Getting closer to the West Coast


We arrived OK in Fort Langley and stayed at the Fort Camping park. This is a pretty good campground we had stayed here several times in the past.


Vancouver


Capilano RV Park.
Capilano RV Park.
Anders and our Grand Daughter Isla sound asleep.
Anders and our Grand Daughter Isla, both sound asleep.
The next day we took it easy. In the morning we had brunch in Fort Lanfley before our drive over to Capilano RV Park right by the Lions Gate Bridge in North Vancouver.


This is a really nice park, the sites are a bit tight, but all in all very good. It is super convenient to downtown Vancouver.


On the 20th of August we picked up our daughter Jenny and our two grand kids, Amber and Isla. Jenny, Josh and the children live in Vancouver.


We brought them back to the RV park and enjoyed the day at the swimming pool. So much fun.


Josh, Jenny's husband joined us for supper that evening after he got off work. It was nice to be with family again.


On the 21st we lazed around in the morning. Then we went shopping in the nearby Park Royal Plaza. Back at the trailer, our good friend Charlie came over for lunch. We enjoyed great food, wine and friends. Charlie's wife Judy had just left for a trip out East, too bad.


Victoria and Home to Cortes Island


On the 22nd of August we took the 11 am ferry over to Victoria and  checked in at West Bay Marina and RV Park. This is the park we stay at all the time when in Victoria. From this park you can walk right downtown Victoria. The setting is beautiful.  Make sure to make a reservation if you plan to stay here!

In Victoria we were happy to see the rest of our family, our son Mark with his wife Lisa and the grand kids Sarah and Ryan, and our daughter Linda and her boyfriend Mathew. Wonderful to see them all again.

Camped at West Bay Marina in Victoria. Fantastic views.
Camped at the West Bay Marina in Victoria. Fantastic views.
We stayed in Victoria for three days. We needed to do a few chores. Liz applied for a new passport. We also both needed a haircut badly.

On the 26th we drove up to Comox and stayed at Cape Lazo campground, a very nice completely re-done campground. It is a beautiful spot.
On the 27th we had an appointment in Campbell River to fix the issue with the truck.

Then it was time to take the two ferry rides home to Cortes Island.

Views from our Dining room on Cortes Island


What a trip this was. We almost clocked 15,000 km and enjoyed every single one of them. This country of ours is so incredible and so beautiful. We have now visited every province and every territory except Nunavut. We will keep that on the bucket list.

More pictures from this part of the trip right here in the clouds.


>>>Start over with post number one>>> in this series.

Here are some shortcuts to all the blogs post from our Yukon and Alaska Trip. Just hover over the number to see where it will take you.

  1,    2,    3,    4,    5,    6,    7,    8,    9,  10

11,  12,  13,  14,  15,  16,  17,  18,  19,  20

21,  22,  23,  24,  25,  26,  27,  28,  29,  30

31,  32,  33,  34,  35,  36,  37,  38,  39,  40

41,  42,  43,  44,  45,  46,  47,