Glide Ride Pinbox - Link Kit Replacement
 |
| Glide Ride Pin Box |
 |
| Back up your truck and use an adjustable utility table |
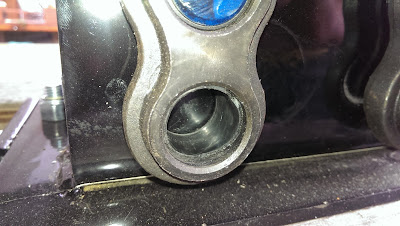
I'm not sure how that had happened. The only thing I can think of is that when the pin box was being assembled, someone hit the "Glide Ride Pin Assembly" way to hard, and it was not properly lined up; therefore breaking the bushings.
 |
| King pin lowered on table by using the front jacks. |
When I talked to Demco they said that they only sell a complete Link Kit ( four links and four bushings). However I only received the plastic bushings.
 |
| Two new bushings and two broken |
Use the camera on your phone to take pictures as you go along. This will help if you not to get delayed at all.
OK, we are set to go to work. So the way I did it, I backed up the truck and set an adjustable utility table on the tail gate.
Then I used the front jacks on the trailer to lower and raise the pin box, so when I removed the "Glide Ride Pin Assembly" the "Glide Ride King Pin Base" would not just drop down.
It is not super heavy but it is a bit awkward to handle, especially when you install it back in again.
If you do not have a table like mine where the king pin fits in the middle, use a flat small table and make a small frame with some two by fours.
The "Glide Ride King Pin Base" is now just touching the table and it is time to remove the "Serrated Flange Bolt", one on each side of the pin box. These bolts are really torqued up so warm up your biceps or do what I did, use an impact wrench.
 |
| Use a flat screw driver |
There is a "Pin Assembly" on each side of the pin box. The "Pin Assembly" holds the whole "King Pin Base" in place.
 |
| Work from side to side (front - back) removing the Pin Assembly |
Once you have the "Pin Assembly" remove on both sides the "King Pin Base" will sit nicely on your table and the "Link Kit" will be partly exposed.
 |
| Broken bushing in Link Kit |
Now take some more pictures so you see how the "Link Kit" is put together, especially how the plastic bushings are installed, top and bottom is opposite.
 |
| Pin Assembly removed from the Glide Ride Pin box |
When you have replaced the bushings or the whole "Link Kit", lower the pin box down again.
Just go really easy when you lower the pin box down so you do not damage the "Link Kit" or the "Urethane Bumpers"
Once you have the "Pin Assembly back in place, it's time to insert the "Pin Assembly". Go really easy here, just nice gentle little taps. Do both sides the same, a little bit at the time.
If you hit the Pin Assembly to hard you will more then likely crack the plastic bushings in the "Link Kit".
Now then you have the "Pin Assembly" in place, it is time to torque up the Flange Bolts. I contacted Demco - Glide Ride to see how much it should be torqued to and they said 80 ft lb.
If you have any questions, just contact me using the contact form on the left hand-side.
 |
| Camping in Rathtrevor Provincial Park, BC. Canada |
